Traditionally, blog posts were all about text and images. However, videos can really bring your blog alive and make the visitor experience more engaging and interactive.
Blogs are the perfect place to house videos that are made by you, your students, or someone else. If you’ve never tried adding a video to your blog, or you’re looking for some additional tips or ideas, you’re in the right place.
It’s clear that when defining the meaning of literacy in the 21st century, being a fluent reader and writer of only print materials is no longer enough. Silvia Tolisano has suggested that our notion of being literate or illiterate needs an update. Being a skilled communicator, creator, and consumer of multimedia is so important. This includes video.
No doubt your students are avid consumers of videos so why not tap into this interest in the classroom?
This post demonstrates 3 ways that you can use videos in your blog posts.
Click on the links below to navigate this resource.
1. Embedding Videos That Others Have Made
1) Embedding Videos That Others Have Made
Many teachers and students like to embed videos they find online on their own blog. That means you can play it within the post without having to open new tabs etc.
An embedded video looks like this.
Tip: When embedding a video, it’s a good idea to also put a link to the video, like this:
Check out the video, What Is A Blog?
Educators or students might embed videos from sites like:
Methods For Embedding Videos
Videos from video sharing websites can be embedded into posts or pages by either using:
- The video URL: Paste the URL on a line by itself in your post/page editor where you want the video to appear. This method only works with certain services.
- The embed code: Find the embed code on the site you’re using (e.g. YouTube) and copy it. Then in your post put your cursor where you want the video. Click on Add Media and then Insert Embed Code. Paste the code and press Insert into post. Note: this option isn’t available on free blogs
You can find the full instructions with visuals on how to embed videos in this Help Guide.
A Note On Copyright And Videos
You may be wondering about copyright, because we know we can’t just take an image from another site and use it on our blog.
It’s fine to use videos from sites like YouTube that give you the embed option. That being said, you can’t necessarily download and make changes to the video (for example, cutting it up, remixing, adding audio etc).
A Note On Safety
Access to sites like YouTube is a contentious topic in schools. Feel free to leave a comment if you have any experiences with that issue.
If you use sites like YouTube, it can be a good idea to set up a class or teacher account if you plan to upload videos or create playlists. This helps separate your work videos from your personal videos.
Most video sharing websites are not designed for children. In fact, you’ll find most Terms and Conditions state that children under 13 are not allowed to use the service.
Therefore, there are a few things you can do if you’re working with younger students.
Embed Options
When you’re embedding a YouTube video, you’ll notice there are embed options. You’ll find these when you click on Share and then Embed.
You might want to uncheck suggested videos and player controls, and consider enabling privacy-enhanced mode.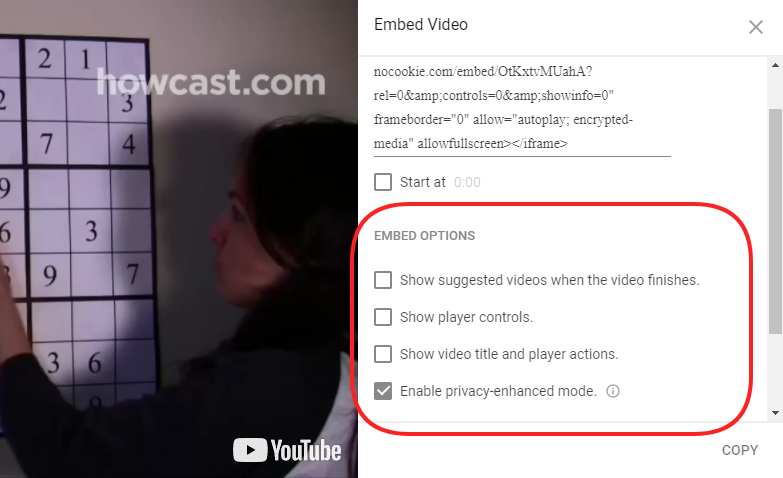
Safe YouTube
If you simply want to show a YouTube video on your television or projector, you might use a tool like Safe YouTube which provides a distraction free link without related videos and other buttons.
This site can also give you links which you can share with students like the one below.
Richard Byrne from Free Tech for Teachers has reviewed some similar tools including Tube, Quietube, ViewPure, and Watchkin.
2) Online Video Tools
Making your own videos is easier than ever! There are online options that are:
- free/paid
- simple/complex
- for editing/creating
- for all ages/restricted to over 13 or 18
- designed for video footage/images/animation
Here are three options for creating different sorts of videos using online tools. Feel free to share your own ideas too!
Screencasting (Loom)
Screencasting is where you narrate a video recording of your computer screen. Sometimes it’s just audio and sometimes you can see your face in the video as well.
One free tool that I’ve found particularly useful is Loom. There are many advantages to this tool including the fact that there are no age restrictions.
I’ve written a blog post about Loom if you want to learn more.
Screencasting is such a versatile way to use video in the classroom. Not only can teachers and students make tutorials, but students can share their learning as a screencast by narrating their digital creations.
For a very simple example, students could narrate a Google Slide presentation as I’ve done below. This is a video I made for our Better Blogging With Students course which we ran in early 2018.
Make Your Post Into A Video (Lumen5)
Back in December, I made a promo video for our Better Blogging With Students course.
I created that with a free online tool called Lumen5.
It’s a simple way to make a slideshow type video.
It can even “automagically” make your blog post into a video (for best results you’ll need to edit it slightly).
Lumen5 contains a library of Creative Commons Zero images and music so you don’t need to search for content either (although you can use your own pictures and video).
The only downside (apart from it being a 13+ tool) is you can’t embed your video directly onto your blog as far as I can tell. So you have to put it on social media or YouTube first and then get the embed code from there. Or you could download the video and upload it directly into your post/page.
Animation (PowToon or Biteable)
There are a number of ways you can create simple animations online. Two free tools you might be interested in exploring with your students include PowToon and Biteable.
Both of these tools have free plans and can be used by students under 13, however, they do require students to sign up via email. I contacted both companies to confirm the age restrictions. PowToon recommended supervision or using a paid classroom account (obviously, supervision is always a good idea!)
One benefit of PowToon over Biteable is that you can download your finished product as a PowerPoint or PDF file. You can only download your Biteable creation with a paid plan.
You can embed both tools into your blog posts or pages.
PowToon Example
This is a video a student made for the Student Blogging Challenge about quality commenting.
Biteable Example
Another student taking part in the challenge created this Biteable about YAPPY.
3) Offline Video Creation
You and your students can make videos in the traditional way too. You don’t need any fancy equipment either — a phone, tablet, or webcam can work just fine!
Here are three ideas that might work for your blog posts.
Piece To Camera
I know, I know… who likes getting in front of a camera? Most teachers would avoid it at all costs! But it is really a great way to connect with students and families.
You could even create the occasional piece to camera for special occasions like:
- Welcoming students and families at the start of the school year (publishing the video before school returns is a good idea!)
- Thanking your class and families at the end of the school year/term and wishing them happy holidays etc.
Depending on your privacy settings, you might encourage students to create these sorts of videos too.
Here is an example Linda Yollis made to welcome her new students to the classroom last year.
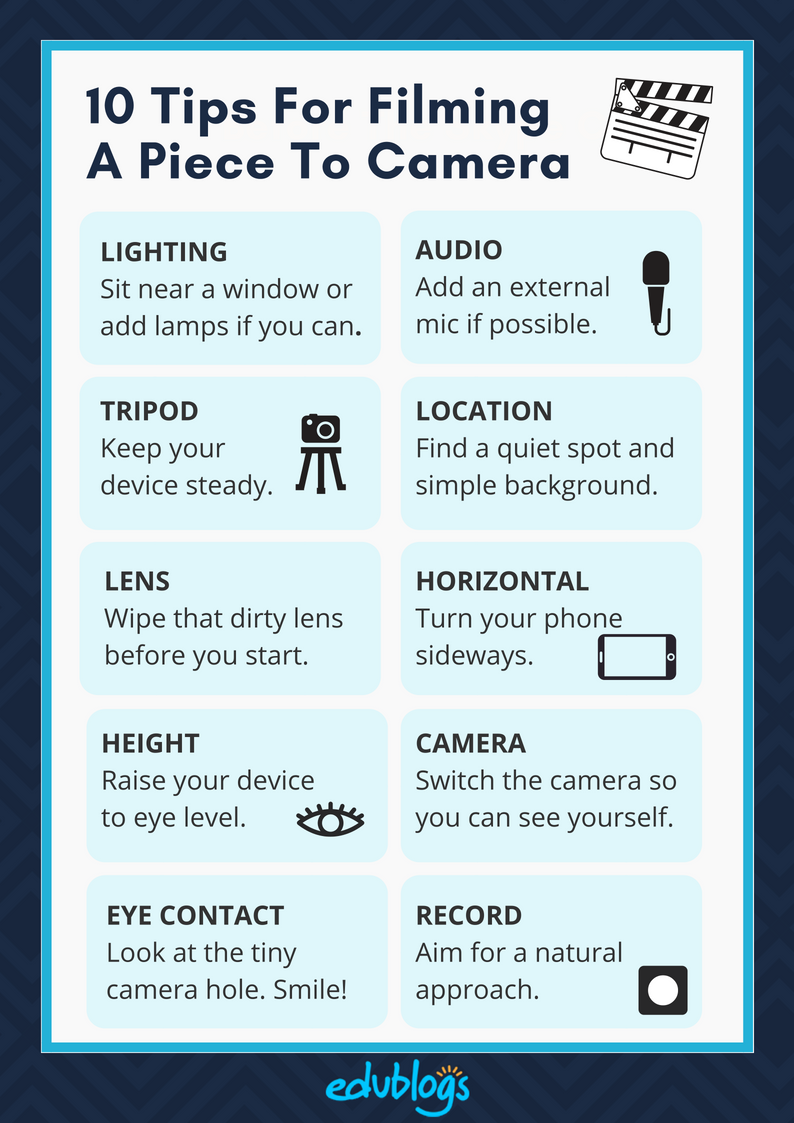
10 Filming Tips
There are a few things you can do to enhance the quality of your piece to camera.
- Lighting: This is really important! Sit near a window if you can or add lamps etc. Aim for even natural light. Don’t have a window behind you.
- Audio: Your phone or computer will record video just fine (in good lighting) but the audio quality won’t be great. Add an external microphone if possible.
- Tripod: If you’re using a phone, it needs to be steady. Many discount stores now sell basic phone tripods. You can elevate these on furniture as needed.
- Location: Keep your background simple and film in a quiet location (easier said than done at school?).
- Clean your lens: Especially if you’re filming on your phone, wipe that dirty lens.
- Horizontal: If you’re using a phone, turn it on its side. If you want to know why your video should be horizontal, you might enjoy this very funny video.
- Raise your device: If you’re using a laptop to film, you might want to raise it so you’re at eye level. Same with a phone or tablet.
- Front facing camera: If you’re alone, switch the camera so you can see where you are in the frame (consider positioning yourself slightly off centre in the frame).
- Look at the lens: Find the tiny hole and try to make eye contact with it. Smile!
- Record: Whether or not you want to actually script what you want to say is up to you. A more natural approach may be to create a few notes or an outline, rather than scripting or reading. Pace yourself and enjoy!
Want to share these tips with your students or colleagues? Download the PDF.
Film Your Lesson
Have you ever thought about recording your lessons and publishing them, not just for your own class, but for anyone who wants to watch and learn?
Eddie Woo is a Sydney maths teacher who has done just that.
Eddie’s award winning work has earned him a huge following with students from across the world.
Eddie has a YouTube channel and houses his videos on his blog too.
Here is an example…
As you can see, it’s nothing fancy but it works!
Of course, students can “be the teacher” too and record tutorials for other students.
Interviews
Depending on the permissions and privacy settings you have in place, it might be an option to have your students act out interviews.
Shawn Avery has done some great interviews with his class. Here is one example when students interviewed a famous person from history. A green screen was used to create the background.
The possibilities are endless! Students could make real interviews or mock ones. And it could work well for so many different subject areas and any age group.
Note on green screens
Want to learn more about green screens?
- Tony Vincent has compiled some different green screen set ups.
- LitFilmFest has shared 7 tips for using a green screen in the classroom.
- Jonathan Wylie has compiled green screen tips from teachers on Twitter.
A Note On Editing Software
Most people know how to record a video. It can be as simple as opening the camera function on your phone and hitting record.
But then what do you do with your raw video?
It’s not always essential, but you’ll generally want to do some basic editing. This can include things like:
- Adding text titles or captions
- Adding music
- Chopping out certain parts of the video
- Mixing together video and images
If you use a Mac computer, the go-to program is generally iMovie. You can also use the iMovie app on your iPhone or iPad if you have one.
It’s a little more complicated on a Windows computer. Windows Movie Maker used to be a popular choice for simple editing but it has been discontinued now.
Personally, I currently use a paid program called Adobe Premiere Elements and occasionally use a free program called Shotcut. There’s a learning curve for both of these editors.
For quick video editing on my phone, I love two free apps from GoPro called QuikStories and Splice. QuikStories puts everything together for you with music, transitions, and other cool effects. Splice is handy if you want to make more manual edits and don’t necessarily want too many effects.
(Note: We have no affiliations with any of the above brands).
Let us know your choice of video editor in a comment!
Conclusion
Want more video tips? Be sure to take a look at our interview with Rob Kelly for more video tips and examples.
We encourage you to have a go at creating or embedding a video. Leave the link to your blog post in a comment so we can check it out.
We’d also love to hear your own suggestions for finding or creating videos.
Lights, camera, action … and over to you!
photographers use to hone their craft and skills. Whether you are a beginner or an experienced professional, photography blogs are excellent sources of knowledge, where talented photographers provide the knowledge and resources to help.SP Photography Studio focuses on quality service and we are not just traditional photographers but we believe in adding fun and entertainment to all the events we do and capturing the true emotions which can creatthe e best memories out of it. Our services includes product shoots, event coverage, Wedding and pre wedding shoots , Drone coverage, Corporate shoots, maternity shoots, baby shoots, and Nature and Landscapes.
Valuable information and excellent design you got here! I would like to thank you for sharing your thoughts and time into the stuff you post!!
Wow such a good blog
I always try to insert/embed videos when I can, but I have a few formatting issues that bug me. I wish I could text wrap them like I do w/ images, and for me at least they always align left instead of center.
Any tips on resolving these things?
Hi Frank,
Unfortunately, videos can’t be wrapped around the text in WordPress due to how the embed code works.
Personally, when I add a video from YouTube etc. I prefer to get the full embed code and embed that, rather than just embedding from the URL. I find it displays a little more nicely as it’s bigger and I also like selecting the box to not display related videos when the video ends.
Not sure if that helps much.
Your blog is looking great by the way. Well done!
Kathleen
Hi again, Frank!
I just found out that there is an option to wrap text around a YouTube video! If you email the support team they’ll be able to share the right code with you. Hope that helps!
Thank you for the ideas! Really appreciated!
Thanks for all those great ideas- I liked your rules for a great comment-
its very help full thnx for share it here
Good post.
Wow, this is so helpful! I’m definetely going to try to use some of these methods at some point!
Fabulous! We’d love to see what you come up with.